Tuesday, 28 February 2012

Gundam 00 Raiser & The Right Sort of Green

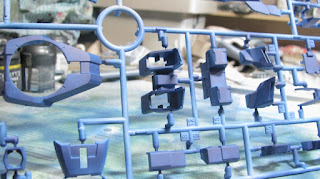
No, I have not been painting my Gundam green. I'll come to that in a moment. What I've been doing with the Gundam, following undercoating, is getting my base colours on. For all the "dark grey" sprues I've now spray painted Boltgun Metal and given a wash of Baddab black, to create a bit of contrast. I'm of the view that the grey parts of the Gundam are supposed to be metal in appearance, but to keep the price of the kits down they don't do metallic colour plastic.
Aside from being able to give the Gundam a more appropriate colour scheme (in my view), the paint also takes away the shiny plastic look of the model. TBH - this is the main virtue of painting a Gundam for me and you don't really need to do much more than that. My friend Wayne painted up an Endless Waltz Gundam Zero Wing and did nothing more than just apply his own colour scheme. No highlighting or blending or anything clever like that (which Wayne is more than "more than" capable of), apart from a bit of shading in the recesses. The finished model looks stunning. A hugely effective yet simple colour scheme.
I intend to do more in the way of shading and highlighting on my Gundam and hopefully I won't come unstuck in the process. I've not yet decided how I will do the highlighting yet, because at present it is a bit hard to orient pieces on the sprue or even work out which part is likely to catch the most light. I will probably assemble parts and then paint them once I have a better idea of the 3D structure.

But as for the green......

We had another edition of "Paint Club" on Sunday and I picked up the Azrael figure I'd be working on previously and decided that I couldn't continue without tackling the "green issue" which had so hacked me off while painting the Dark Angels devastators. However, rather than compromise the work I'd already done with an "experiment" I brought a spare figure with me and worked on him first to see how the green went.

I'm much happier with these results. I used Orkhide shade for the green, which blends much better with the black and has less of a yellow tinge than DA Green. This gives me the shade and contrast I want, without having to create an overly light highlight. Knarloc green works well for the edge highlighting. I just need to decide how much blending and highlighting work I want to do.
And here's the Azrael in progress. I repainted all the green from the original colour scheme, working from a black base, followed by a 50/50 Orkhide Shade and Black mix, then Orkhide shade and then a simple edge highlight of Knarloc Green. I felt a lot more positive about the experience, so I carried on with building up the highlight on the robe. 

I'll come back to these once the Gundam is complete.

Monday, 20 February 2012

Gundam 00 Raiser - A change (and shortage) of space

This is my workspace, or my workspace of a few months ago. I've made a few changes since then, including a new paint rack from http://www.miniaturicum.de/ who I can heartily recommend.
Same room, different angle. Here you can see how deftly I can switch from relaxing while painting, to relaxing while playing on my computer. Or changing the music I'm listening to. My painting chair is something I'm very particular about as it is, despite probably being about 20 years old, extremely comfortable for painting.

I provide all of this as context, to be clear that I am not cramped away in some cubby hole by my missus where she can hide my pursuits from visitors to avoid embarassment. At the same time, I do not exactly luxuriate for space, but I make do. This exposition is here so we're perfectly clear that I don't have enough space to work easily with a Gundam Master Grade kit.

More after the cut.

Tuesday, 14 February 2012

Dark Angels - A Slightly Sulky Conclusion

And so the painting of my Dark Angels Devastators (plus a couple of Sternguard) has drawn to a somewhat slightly unhappy close. I've upgraded from the position of very unhappy yesterday because, after having 24hrs to distance myself from the figures I'm slightly less frustrated by my work. Actually, if I were to quote my former boss, I'd say that I was "less than extremely satisfied" by which I believe she meant that unless she was "extremely satisfied" by something, it wasn't any good. I'm not sure I've set myself a bar that high, but when you work for someone like that, their behaviours do influence you.

More angst and analysis after the cut.

Thursday, 9 February 2012

Dark Angels - WiP- Seeing Red.....

With the main body of the miniature early on (thanks to the airbrush) I've been taking my time on the details. One of things I'm particularly keen to get right the red on the weapons. Now I've done red on weapons the more traditional way on figures in the past, as you can see on this Deathwatch figure above, which I painted a while back. Now I'm happy with how the gun turned out on this guy, but it's a bit "bright" and "cheerful."
I'm painting "Dark" Angels, so I want something a little more sombre.
I also want the red to be consistent with the zenithal lighting so I only get a sharp highlight at the points where the most light hits the model. At the same time, I want to have a nice shadowy red anywhere the light doesn't hit and have good colour saturation. So I'm using all reds all the time.
In a way, most of the ground work is done in the earlier stages where I used two red paints from a reaper triad that go really well together. The problem with them, is that they're a somewhat purply red and a like my Dark Angels red to be a little bit more fiery. However, the reaper paints are the basis that makes what follows work. All I do is heavily thin some citadel Blood Red and then apply that carefull to the relevant parts of the model for my zenithal highlight, while blending it down into the shadow. This takes quite a few passes.
As the two tones I applied earlier compliment each other really well and the Blood Red is effectively a wash, all that happens is the two tones take on some of the qualities of the red and I lose most of the purple tone. This gives me a colour I like, but I retain my shading and I can still build up a strong highlight that blends well.
The next step is to apply a line highlight to pick out the edges and give those a little more definition. Citadel Blazing Orange or Reaper Lave Orange works well for this. The orange line highlight by itself is a little too obvious, so I go over it again with my Blood Red wash to tidy everything up. After that, I apply a quick wash of Baal red to tidy the transitions up further and just take the edge off the brightness, to give me a darker red.
I really like how this looks, as I get a nice red colour on the weapons, without it being "day glo" and inconcistent with the zenithal lighting on the armour. As you can see on this pick (and the earlier ones), I've also done some some work on the plasma coils to get the brightness right. I'll do a slight particle glow effect to finish them off.

I've also painted the black elements on the weapons and armour. I use the Reaper Dark Elf triad for this, with a blue wash and a black wash afterwards. This gives me a more interesting black colour (which would otherwise be a bit flat). Annoyingly, I think I overdid it on the washes and I'll have to go back to repaint some of the highlighting in, as it is now hard to see there.

I've also done shading and highlighting on the metalwork of the weapons and armour, as well as applying a highlight of mithril silver to pick out the zenithals again. I still need to do some more work here, as I haven't quite got the definition I wanted and I also want to try my hand at Ron's heat stained gun barrel effect for a bit of interest.