Showing posts with label Deathwing. Show all posts

Thursday, 15 December 2011

Deathwing - Jehoel & The Meaning of Regret

Taking a few days off work to recover from a particularly hellish month and I've been able to get on with my painting. This guy has been in the works for a while now, but my recent impetus sped things up considerably. After some research, I've decided this fellah will be called Jehoel a.k.a The Angel of Fire.
He's one of the additional figures, the others being Castiel and Bob who I covered in my last entry, I've been working on alongside the AoBr squad.
Jehoel is a converted Forgeworld Huron of the Astral Claws figure, with some Deathwing inconography added on and the right arm replaced with a flame unit. The approach to painting him as been, more or less, consistent with that of the AoBr squad, although the overall shading is a lot more subtle in places. I really like the green scale tabbard on this figure, it looks like it is part of some sort of additional flame proofing.
Although it looks like a fantastically busy figure, there isn't that much detail to contend with and breaking it all down into a sensible structure allowed me to make reasonably swift progress. I think the blending of the red on the Flamer units went particularly well, particularly the left hand one. I should mention that the base is a micro arts 40mm tech base. I put some weathering power (Forge World Medium Earth) on there to create a rust effect and was really pleased with the effect, so I went and redid Castiel and Samael's bases with it as well.
So why have we got a Deathwing figure who is decked out with more than his fair share of flame weaponry? Is he a Salamander who got lost? Rest assurred there is a story behind all of this, as there is behind Castiel and Samael, the Angel of Death. I've got quite a bit of typing ahead of me but, this is not a long story to tell. I shall crack on with it tomorrow. For the time being, I'll sign off with a picture of my Deathwing army as it now stands.
In case you're wondering, no, I have no idea what the points cost of this little lot is, especially as it only really has two coherent squads in it and a lot of personality pieces.


Tuesday, 13 December 2011

Deathwing Squad - Finished

Actually I finished them over a week ago, but work and the festive season has been a major impost on my time.

As much as I'm not a fan of the Assault on Black Reach squad, I think they look pretty good with a few modifications and overall I'm happy with the final paint job.

The final few steps were quite simple, but add a lot of the finished look of the models.


1) Do edge and extreme highlights with P3 series Menoth White. This is an off white colour which blends superbly with the other paints and also has a great consistency. The Menoth white is applied to anywhere on the model I perceive as getting hit by the most light and along the leading edges of the carapace. I do thin the paint slightly so I can easily feather it onto the model.

2) I finished the skull and cross bones on the Terminator honours, by painting on a highlight of Reaper Master Series Aged Bone, washing with gryphonne sepia and badab black, followed by a final highlight of Aged Bone. This gives the Terminator honour a bone look which is distinct from that of the armour.

3) The bases I gave a fairly vigorous dry brush of GW Tin Bitz and then a lighter dryrbush of mithril silver.

4) For the Sergeant's power sword I tried a new approach which I'm rather pleased with. It needs some refinement, but I think I know how I'm going to evolve this. What I did was.
  • paint the sword mithril silver
  • wash the sword with Asurmen Blue, building up the shade into the recesses of the sword and thus creating a defined highlight at the centre and on the edges.
  • notice the shading is very dark, dry brush the sword with a very very light blue paint, which picks up the highlighting at the edges
  • rewash the sword and notice that the dry brushing combined with the wash has created a nice particle effect
  • drybrush lightly with the light blue again
  • paint on the lightning effect with the light blue
I think I'll modify this approach in future to use a couple of darker light blues for the particle effect and lightning before applying the final highlight.

But I think it looks good and different to my other power sword effects.

5) Paint the purity seals. I keep this simple by painting the seals bleached bone, washing all over with Gryphonne Sepia and then a further wash of Devlan Mud into the recesses. Then use thinned bleach bone to build up a highlight. The litanies and what not are painted on with a mix of brown and black ink.

And that's pretty much it. Although I recall I mentioned I was working on a few other figures.

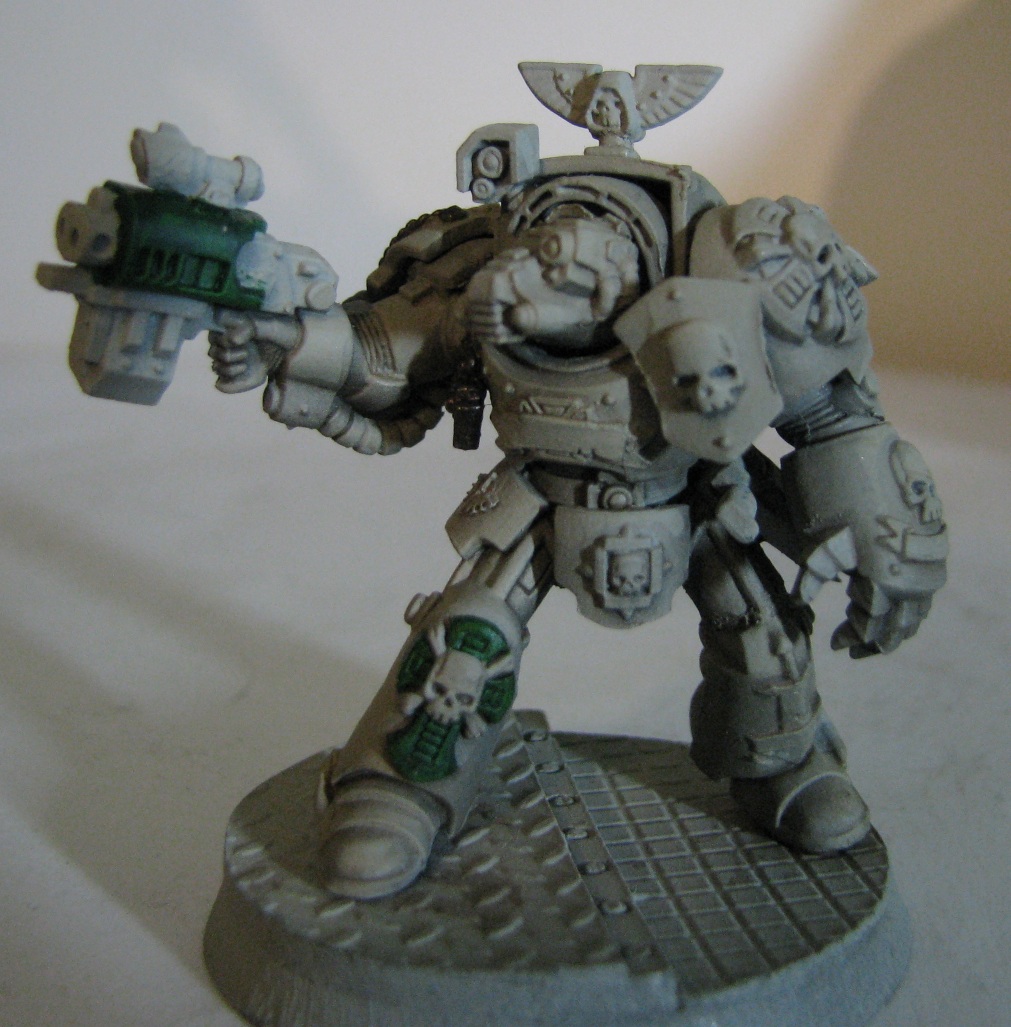
This is Castiel (I'm a Supernatural fan, so sue me) and he's got a story behind him which I'll share at a later date. He's actually fairly customised assault squad terminator, in that his right leg is from two different sets of legs (amuptated at the knee) so he has a different pose. The gun has been modified with a scope and the right arm put out at an angle with a fair amount of green stuff masking the gap. 
I'm really pleased with how dynamic this pose is and he's a welcome reminder of how much better the proper Terminator figures are over the black reach set.

And this is Bob. I don't know why he's called Bob. he just is. I'm not so keen on this pose, although it does look like he's about to drive his chainfist into something in a meaningful way. I also did some battle damage on Bob, although I'm not sure how well it turned out.

Sunday, 27 November 2011

Deathwing - Step by Step Part 4

I've been fiddling round with lighting since I got my new desk and installed some new bulbs into my spotlights, so I have a whiter light than previously, This is still all w.i.p, but I think I'm getting there in improving my macro photography set-up.

For this stage I've been focusing on some of the details of the model, specifically the green, red and stone elements of each Deathwing squad member.
 I try to avoid making the reds on my Deathwing too bright, while still having a strong degree of contrast. I work from a very dark red base and then use a thinned Blood Angels red to create my highlights, carefully feathering on a little at a time so the highlight slowly builds up. I also try to do this so the lighting is broadly consistent with the zenith lighting on the rest of the model. I play a little fast and loose here though, because if I was totally honest to the zenithal approach I'd not paint in some of the detail.

For the greens, I start with Dark Angels green and wash heavily with black, as I did in the previous update. I then paint DA green back over the areas getting the most light, blending it back into the shadowed areas with the darker tones.

I really really want to avoid a bright highlight on the green. I have it on some of my earlier Deathwing and DA miniatures and it really doesn't work for me. So the highlight I use is a mix of Snot Green and DA Green in a 3 to 1 ratio (snot to DA). As an aside at this point, if any of you produce snot that looks anything like citadel think it does, see a doctor. Please. That's just not normal.

As with the red, the paint is thinned a fair bit and carefully feathered onto the model, gradually building up a highlight.

In the case of the Storm Bolter, I'm pretty liberal with the lighter shade on the very top of the gun, as that is being hit full on by the light source. Having said that, I try to make suure I've got the most highlight at the edges so they're clearly defined. I then feather it down into the darker tones. Again, if I were true to my zenith lighting approach, the detail on the side would be lost, so the bottom edges of the side detail get a touch of hihglight. They're not in direct light (even if it looks like they are in this photo), but without a little highlighting the side of the Bolter would look very flat.
For the joints in the armour (and arm cables), I use Reaper Master series Dark Elf Skin triad to build up contrast in the flexing of the joints, before washing them with Baddab Black. It is a little time consuming for such a small area of detail, but I like the effect and it is more interesting than just drybrushed black.
All the stone detail on the armour is next. Again I try to be consistent to my zenith highlighting. Adeptus battlegrey goes on first, followed by Codex Grey hitting most of the highlighted areas. I then wash with Baddab Black to bring out the detail and pick out the areas getting hit with the most light using Fortress Grey. Other than washing the skull and bones with Baddab Black, I've not done anything with that area yet.
Finally the eyes have it. This is a pretty basic approach, starting with a dark red, then applying increasingly small amounts of lighter tones towards the front of the eye until I finish with sunburst yellow right at the very edge. I then give the eyes a little wash of Baal Red, to blend the transitions and let a bit of the darker cooler pool into the socket. I use a very fine brush for this, either a Reaper 20-0 or Winsor & Newton series 7 000, as citadel don't do a very fine detail brush. The only thing missing from the eyes is a little refracted light blob in the corner of the eye.

All that's left to do now are the purity seals, some of the metal work, the bases and the final highlight on the bone.

Tuesday, 15 November 2011

Deathwing - Step by Step Part 3

I've had to change my lighting for these images, because the highlight was getting bled out by my lightsource. I really do need to sort out a proper lightbox for macro-photography, but until I get my study redone its very much a project on the back burner.

The next step (or steps as I've done a few things) is to apply the highlight to the parts of the model which get the most light. I generally work on the basis that my lightsource is more or less directly above, at a slight angle. I do play a little fast and loose with this for the sake of the mini looking good and keeping definition where I want it.

The principle of this is simple enough, in that the parts which get hit by the most light are the brighest with the colour gradually bleeding out the further you get from the lightsource or where areas are in shadow. Actually explaining how I do it is somewhat trickier. Hopefully you can see in the picture above what I mean, in particular the areas in shadow. Those areas are untouched by the highlight, most notably the vent area at the back of the carapace and the sides of the torso.
The two images above show more of the shaded areas and also the much stronger contrast between the upper surfaces of the model and those areas which are shadowed. You might also be able to see that I've washed the gunmetal parts and grey of the figure with a thinned Badab Black wash, to add some depth.

The technique for the highlighting and getting a reasonably smooth transition to the dark is a bit of cheat really. Rather than wetblend the two colours together (which takes ages), I instead thin the highlight paint a fair bit (Reaper Master Series Aged Bone) and then gradually layer that on.


Now a reasonably thinned paint behaves like a wash, so it needs to managed carefully. It also pool at the point of contact with the model, so you have to be careful not to apply too much paint to your brush. My technique involves first applying the brush to the area I want the main highlight to be, drawing the paint away a bit, then drawing it back leaving a thinned coat behind. I do a few passes, drawing the brush further away it each time, building up the top highlight while bleeding the colour out further. Because the Reaper triads compliment each other so well, this is a surprisingly fast way of getting a decent blended bone highlight. It doesn't look as good as a full blown wet blend but, doing that would drive me to distraction.

You might also have noticed that I've left the skull and crossbones on the Terminator Honours as bone. While the standard Terminator fluff is that the Honour is carved from the rock of Marines homeworld, I've never been keen on that for my Deathwing. I've done my own fluff here and drawn my inspiration from the original Deathwing novella, where the marines are a tribal people akin to the Indian tribes of North America. Part of their Terminator Honours are carved from the bones of fierce beasts they've hunted (as part of a coming of age ritual), fused with the stone cross and then covered with a protective layer of something. However, as the beasts they hunt are naturally very tough, the bones are unusually resilient anyway. The new Dark Angels novels (which are pretty good imo) have the recruits hunting down incredibly dangerous beasts on the deathworld of Caliban, so the whole bone Honours thing carries through. The trick is getting the bone effect on the Terminator Honour to look different to the rest of the armour. At this point its early days, more work to do there yet.

Finally, I've also washed the Dark Angels green on the Storm Bolter, chest Aquila and other elements of the armour with thinned Badab Black.
I've realised that I like the green on my Dark Angels to be quite dark, so making it as dark as possible first means I can avoid the fairly aggressive yellowy highlight I have on some of my earlier Deathwing minis.

Tuesday, 8 November 2011

Deathwing - Step by Step - Part Two


As you can see in the picture above, I've finished painting in the various other elements of the figure. I've painted a dark green over all the black elements I want to be green and I've painted the base Boltgun Metal, followed by a wash of Devlan Mud.

I don't know about the rest of you (because my network of spies isn't that efficient), but I really do have to be disciplined about thinking about the entirity of the composition as I'm painting, rather than focus on a bit of detail at a time. This was something my A Level art teacher used to berate me for and quite rightly too. If you don't work on a piece in its entirity, what you end up with is something that looks oddly inconsistent. But, it is soo easy to get drawn into working on the detail of particular aspect of a model up until its finished, then move onto the next part. You can create a consistent effect that way, but it is much harder and the risks of getting it wrong are a miniature that looks, at best, weird and at worst like it was painted by a few different people on different days.

The airbrushing really helps with this, because I can quickly do the early stages of the core colour scheme over a number of figures quickly and consistently. After that, it is just a case of picking which element to paint next and doing that for all the figures. Honestly, I find this can be a bit tedious at times, but I also find it the only way to create a reasonably consistent finish.

This is probably less of an issue if you're painting just a single miniature, but even then I'd still strongly advise in trying to paint all aspects of the model in stages, rather than finish one bit and move onto another. This is because getting other elements painted does change the contrast with the other paints, which in turn can parts already finished now look odd.

As I mentioned earlier, all the green bits were first painted black. I've previously tried to avoid this step as a time saving measure and, to be blunt, it doesn't work. It doesn't save time. On a miniature as lightly coloured as this, you'll have to apply multiple coats of green paint to even get the colour somewhere approaching the dark shade needed. Painting black is an additional step, but it saves time in the long run. Don't skip it.


I also want to talk a little about the paints I'm using. Above is a picture of the Bone Triad from Reaper Master Series, with paints sorted darkest to lightest (left to right).  Apologies it is not so easy to see the different tones, I accidentally spray painted the Aged Bone bottle.

By now it should be clear that I'm a fan of Reaper paints. They have great consistency, water down well so the pigment doesn't separate and the little dropper bottles are much better for keeping the paint fresh. Okay, occasionally you need a pin or something to unblock the nozzle, but that is preferable to me than having to rehydrate an entire bottle of paint. Something I have to do with the citadel paints, frequently.

The other great thing about the Reaper Master series is that the Triads have been really well thought through. The different tones work together really well and indeed, you can apply them sequentially without the need for much blending. I know citadel and other brands have all got on board the bandwagon of organising paints into triads of dark, mid and light tones, but they don't do it nearly so well as Reaper.

Tuesday, 1 November 2011

Deathwing - Step by Step Part 1 (now with added PINK!)

This opening image is by way of an explanation about what this little series is about. First and foremost it is about how I go about painting Deathwing. Secondly and secondmost its about how I'm going about painting Deathwing bone armour in a different way.

On the left in the picture above is my old style of painting Deathwing armour, which produced a bone effect, that was a little too warm for my tastes. Too creamy even. Although the technique isn't bad, there is scant regard on the bone armour for light sourcing. It is not a bad figure and not bad for my first year getting back into painting. There is a lot of it I'm happy about, especially as it was my first conversion. I'm not thrilled about the badly drilled gun barrels, but otherwise its ok. Apart from the gun barrels. And the bone.

Earlier this year I finished my first ever 40k tank and being fairly ambitious, I decided to start big and painted a Deathwing landraider crusader.


I took a different approach to painting the armour on this, as I figured the creamy bone just wasn't going to cut it. I used different paints, used my airbrush properly for the first time and also played around with weathering powders. I'm much happier with how the bone effect for the armour came out, I changed the colour scheme for other elements of the armour from the way I normally did them and generally had a blast.

This led to me painting the guy on the left in the topmost picture and also directly above here, the Deathwing Angelus Mortis. This was a much more ambitious conversion for me and I'm again happy with the results. The bone armour is painted with much more attention to light sourcing and is much cooler than the creamy bone. There's a lot of other elements included as well, like battle damage. They're not perfect but, it was my first attempt at doing them on a figure.

The long and the short of this is I have a new way of painting bone coloured armour and I'm still refining the approach. So lets get started.

First up we have wait we're painting, the assault squad from Black Reach on shiny micro-arts bases.  Some of the models have slightly shonky green stuff additions, which are my first attempt at sculpting extra features on armour. After cleaning, prepping and assembly, I've drilled the barrels and added a few additional features (extra purity seal and terminator honour). I've also either replaced all of the shoulder pads with those from the Dark Angels bits sprues, or moulded my own emblems using green stuff and instant mould. Basically this just an image of unpainted plastic figures. Woo, guinea pig!

Next step is to prime them with grey. I find white to be too bright and difficult to work with in the early stages and black is too dark for bone. Once they're dry, I apply a wash of Devlan Mud to pick out the details and establish some contrast. I know washing at this early stage is odd but I find it helps build up the depth as I go.

You might also notice that the squad sergeant has a helmet rather than the default bald head. This is because I really don't understand the GW convention of indicated officers or characters by removing their armour. It MAKES NO SENSE to me, so I tend to do away with wherever I can.

I then break out my trusty Badger 150 airbush and get to work on my colour scheme. First coat is of Reaper Master series Bone Shadow all over the miniatures, followed by a coat of Reaper Polished Bone. The latter is applied from the direction of my lightsource, so various parts of the model don't get hit by the slightly lighter shade.
Apologies that my macro photography is the best, but hopefully you can see on the arm how the lighter paint has sprayed onto the upper areas of the model and left underarm, back of the shoulderpad and other areas darker. The contrast is stronger than it appears here, but I still don't have an ideal light set-up for pictures so some of the colour has bled out.

I then applied another wash of Devlan mud and here things went slightly wrong and by wrong, I mean pink! Basically I used an old bottle of wash, thinned it and because the paint was old, the pigments separated from the wash and I wound up with a weird pink residue all over the model. Hopefully you can see that in the left model.

Now the pink wasn't a total disaster as in some areas it did add an interesting element of colour to the recesses, but in others I was just left with an odd, brightish, pink shading. Lots of rewashing and tidying up with Polished Bone followed, until I got to the figure on the right.
Once that was all done, I then carefully went back over the figure with the Polished Bone, applying a thinned layer to those areas that were not in darkest shadow. You can see the detail in the picture above and also areas (like the vents at the back of the armour) where I haven't applied the lighter colour. At this point the contrast isn't too great, partly because of my sub standard macro photography, but mainly because I've only applied a base tone, mid tone and shade. I've got two more tones to apply yet, the top tone and my edge highlight, at which point the contrasts should pop out more.

*edit* - I missed out a step!


After the tidying up with polished bone, I then applied a very thin wash of Gryphonne Sepia evenly over the entire model. The reason for this is because it takes a little of the coolness off the bone colour and also helps tidy up some of the transitions.


The final part of this early stage was to put my details in, to help bring the composition together. I find once I've got the basic details there, it is easier to go forward with the rest of the armour. The long standing theme for my Deathwing recognises the Dark Angels chapter, where elements of the detail are painted in green. This stems from the original Deathwing boxed set.
I've always though the green was a neat touch on these figures, as it ties the Deathwing back to the parent chapter and generally I think it looks a bit more interesting than just painting the guns red (as they are in the current DA codex) or leaving them black (which to me is preferrable to red, but not as good as green).

Pretty much all the black areas will, eventually, be painted green (accept for some areas that will stay black). Then I have red, which to me is as much a colour of the Deathwing as the bone is, as it ties back to the pre-heresy DA colour scheme. For the red I start out with a very dark tone, Brick Red from Reaper Master series, which provides a nice brooding contrast to the later highlights.

All of the skulls get a coat of foundation Adeptus Battlegrey. I used to do the skulls using the Reaper Bone tried, as it contrasted nicely with the creamy bone armour and I felt the skulls should look like skulls. However, as I'm now using the Bone Triad for the armour, that approach simply doesn't work, so I've gone with the traditional stone look. I've also painted elements of the Crux Terminatus in grey, but left the skull element unpainted as of yet. I'll explain this in due course, as the reasons are also drawn from the Deathwing background.

Getting to this point has actually taken a fairly long time (I'm actually painting two other Deathwing figures alongside these five) and the next stages should go slightly more quickly. I'll crack on with these over the week and with luck, have another update ready for Sunday.

Monday, 10 October 2011

I Don't Like Black Reach

I've got my three Solonavi themed figures nearly complete and hopefully will get those up later this week with a few explanations as to how I did various bits. I plowed through them in about 5hrs at "paint club" on Sunday.

While I was painting for paint to dry, I started tinkering around with my Black Reach Terminator Assault Squad, on which I'll hopefully start doing a step by step guide in the next week or so once I'm back from Scotland. However, I wanted to say now just how much I dislike them and hadn't realised until last night why I'd not touched them in weeks.

Yes, I want an assault squad to mix in with my more detailed Deathwing figures so that I have some more conventional figures to accompany my growing legion of character models. The Black Reach squad is ideal for this purpose as they are pretty bland, although I've had to do some custom ornamentation to ensure consistency with my established theme. The blandness of the squad I don't mind, but does the plastic and assembly really have to be so awful?


I know there isn't a lot to assemble, but the Torsos simply do not glue into place properly. Every last single one of them I've had to trim, adjust and variously fiddle with in order to get it to fit properly. Something which isn't a problem with the regular Terminator kits.


Specifically the bits highlighted in red here. Yes they click together just fine when the model is dry but the moment you apply glue, the hydraulic pressure of the liquid works against you. It is very annoying.


I've little experience with the rest of the Black Reach set, but if the Terminators are any indication of quality, I'd certainly warn anyone against buying it as a "starter set" for someone new to 40k, as the quality is not representative of the rest of the brand. I'm certainly not convinced the set represents VFM of any sort and I am very glad not to have purchase it in its entirity. £5 for the Terminator assault squad seems about right to me.

Sunday, 21 August 2011

Sculpting - Not Easy Being Green

This week, in my post Gen-Con/pre-Gathering haze, I took it upon myself to try a little bit of sculpting with Green Stuff. Mostly as a result of watching the excellent Jason Wiebe in action at the Reaper stand and thinking to myself "I can do that" despite knowing full well that sculpture has never been my strong point.

So rather than ease myself in with a bit of gentle painting on familiar terms, I got distracted first by these guys

They're from Reaper Miniatures Warlord range and the level of detail on them is silly, given how much smaller they are than Marines or Terminators. I was drawn to these guys because they reminded me of the Solonvai heroes from Mage Knight Pyramids.
Pretty sure that is a Wizkids stock photo of Seeker Mock, so all credit to them for this. Anyhoo the facemasks and weapons of the Warlord miniatures reminded me of the Solonavi and I've gone with the whole purple/black/darkmetal colour scheme. How I'm going to achieve a crystaline effect on the weapons I do not know, especially as I can't get the purple on their clothes right yet. They are gorgeous minis though, especially the assassin with her very dynamic pose.

The relevance of this to green stuff is that I did sculpt the bases with green stuff to create a fairly basis stone floor pattern. Which came out okay and inspired me to do something similar with the Black Reach Terminator Assault Squad I won on ebay.
The results are better than I'd hoped. Well at least the skull looks like a skull, but I understand skulls very well so that was perhaps an easier sculpt. The right hand one was supposed to be a sword, but it came out as more of a cross. Learning how to effectively work green stuff is going to take some time but I'll plug away with and hopefully improve. Vaseline as a lubricant to make the stuff easier to work was an important step, as I'd just been using water previously and that didn't turn out so good.
For example this guy, one of my many Deathwing w.i.p and companion piece to the Angelus Mortis, has had a fair bit of green stuff work done on him. The right arm is reposed and the inside shoulder joint reworked with green stuff. The bottom right leg is from a different set of legs altogether and I rebuilt the knee joint with green stuff. Not perfectly, but well enough. For giving your miniatures more dynamic poses and a more personal touch, green stuff is hard to beat.

Monday, 1 August 2011

Constructing a "to do" list before I leave for America + shopping list

Off to Gen Con Indy tomorrow for a week of fun, sun and buying things. Probably lots and lots of tiny mens, depending on what I find in the trade hall.

Having finished Project Dreadnought yesterday, I'm already constructing a "to do" list of things to paint on my return. Having looked at Ron's Librarian update this morning I've decided that I must do some more work on my own Deathwing Librarian upon my return.

I don't need to do much to him, but from looking at Ron's finished piece I've realised that the base is sorely in need of some love. I also want to add a bit of freehand to his tabbard, which I'll keep simple as the figure is busy enough already.

Should be a simple enough task to perform and a good way to get back into modelling after my holiday.

Also, more as a quick mental note to myself, here is a little shopping list of things I want to buy at the con.

1 - More reaper brushes - these seriously blow GW brushes out of the water, especially for detail work.
2 - More reaper master series paints - any that I'm short of (bone triad) and a few colours I like that I don'thave.
3 - More resin bases - from whatever vendors have that take my fancy
4 - Any cheap GW figures - because paying less for more is always good.
5 - Another other model kits that take my fancy.
6 - LRP/Steampunk costume - because I have two events coming up at the end of August and September and want to look my best.

Cya all in a week.

Sunday, 31 July 2011

Forgeworld Deathwing Dreadnought 99.9% Complete

I say 99.9% complete because I might tweak things on the base and the miniature yet, but otherwise I'm confident this guy is pretty much all done.


He's taken long enough to do, mostly because of the near complete repaint when I decided that I really wasn't happy with my old style of painting bone. Which as you can see was working from a base of bubonic brown and building up to a pale highlight, but the overall effect was too yellowy for my liking and didn't have the coldness I wanted of my bone colour.

Now I confess the old style attempt was largely the result of the paints I had at the time and relearning how I used to paint Deathwing as a lad, almost 20 years ago. A lot has changed since then, the main thing being that I have the cash to not have to "make do" with the paints I have. Plus the world of paints has moved on as well and I'm not limited to what Citadel has to offer me. Since my friend Wayne introduced me to Reaper Miniature Master Series, in particular the bone triad, I really have't looked back.
The last (and first) Deathwing venerable dreadnought (fy - all Dark Angels venerable dreadnoughts should be Deathwing imo)  I did using the technique of bubonic brown as a base, then blending up mixing the brown with Master Series creamy ivory. It is not a terrible bone effect, but the yellow tinged bugged me.

The painting of my first landraider using the reaper bone triad and my new Badger 500 airbrush was something of an eye opener. I loved the bone effect achieved with the triad and it needed to finish it off was the P3 Formula Menoth White from Privateer Press to edge the highlight (a superb offwhite colour for bone and also an excellent paint). Which isn't to say that the overall colour schemes are so radically different that I can't field them in the same army.
I've also made use of the Forgeworld weathering powders on the vents of the model. I'm growing increasingly fond of the weathering powders for smoke/burn effects on armour. I'm not entirely happy with Raziel's name badge (from the Forgeworld Dark Angels brass etching pack), because I got it stuck on wrong. I'll just have to live with it and blame careless Techmarines.

I might tweak the soot from the ejection port for the assault canno, to have a more intense scorch mark nearer the port, but otherwise I'm pretty happy with it.

On the red detail of the dreadnought I did the final highlight by using a technique Ron posted on FTW about painting Flesh Tearers. I used bleached bone as an edged highlight as Ron did and washed with Baal Red. I'm quite pleased with how it turned out.

I slightly changed how I did green as well. I still used Dark Angels green as my base, followed by a black wash. However, Snot Green for my highlighting was too bright. To get a darker highlight, I mixed Knarloc Green with DA Green (approx 50/50) which gave me an effect I was happier with.
And so now he's pretty much done. The 0.01% of the complete still to do isn't the tweaking I mentioned earlier, but the other arms. I've got another close combat arm and two ranged weapon arms (autocannon and plasma cannon) still to finish. But, they're not far off. The arms are magnetised see, so I can mix and match them as I see fit. I also intend to build another Forgeworld Venerable Dreadnought at some point in the future as a Deathwing Mortis Dreadnought. Providing I get the technique for the bone right, the arms should be pretty much interchangeable between the two.